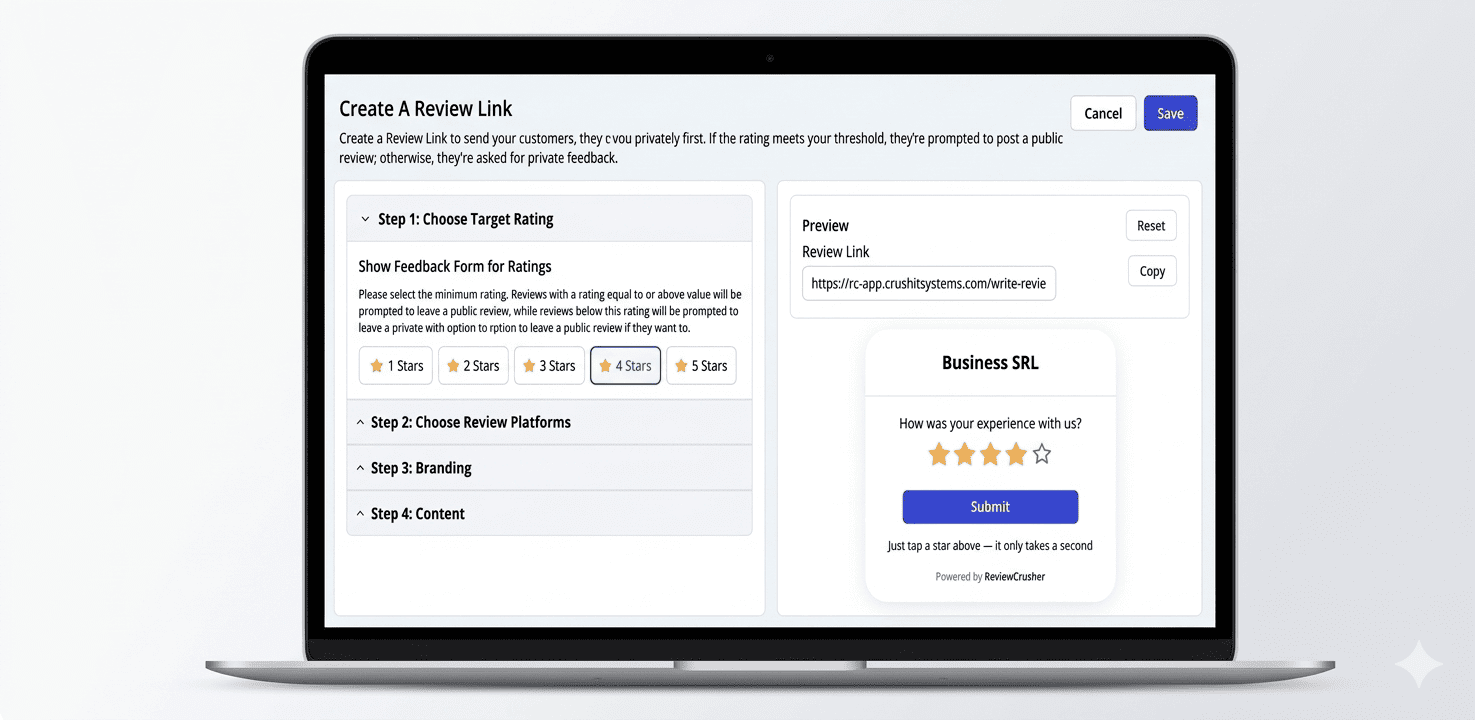
Create a Review Link

A Review Link lets you collect customer ratings through a branded feedback page. Customers rate their experience first, then ReviewCrusher can guide them to leave a public review if their rating meets your selected threshold.
If the rating is below your threshold, the customer is directed to leave private feedback instead.
Where to find it
Go to:
Get More Reviews → Review Links
Open the Create A Review Link screen to configure your review flow.
How it works
The setup is divided into 4 steps:
- Choose Target Rating
- Choose Review Platforms
- Branding
- Content
A live Preview panel appears on the right so you can see how your review page will look before saving.
Step 1: Choose Target Rating
In Step 1: Choose Target Rating, select the minimum star rating that should be treated as a positive review.
You can choose:
- 1 Stars
- 2 Stars
- 3 Stars
- 4 Stars
- 5 Stars
The screen explains that:
- reviews equal to or above this rating are prompted to leave a public review
- reviews below this rating are prompted to leave a private review
For many businesses, 4 Stars is a practical starting point.
Example
If you choose 4 Stars:
- customers who rate you 4 or 5 stars can be directed to leave a public review
- customers who rate you 1 to 3 stars are routed to private feedback
Suggested screenshot: Step 1 expanded with the star threshold buttons and preview panel.
Step 2: Choose Review Platforms
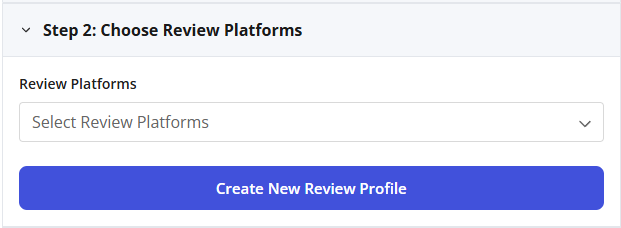
In Step 2: Choose Review Platforms, select where you want happy customers to leave their public review.
Use the Review Platforms dropdown to choose one or more review destinations.
If the platform you need is not already available, click:
Create New Review Profile
This opens a modal where you can create a new review destination.
Create New Review Profile fields
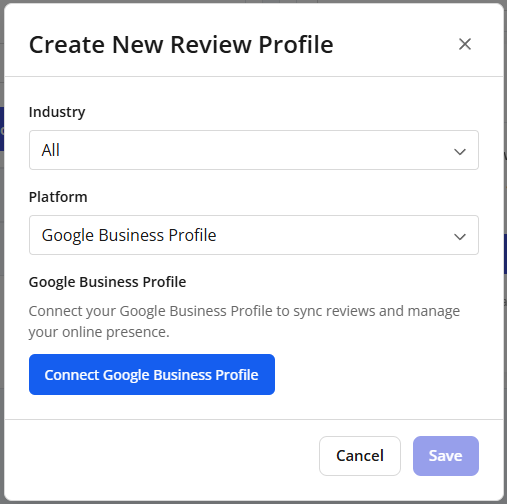
When the modal opens, complete these fields:
Industry
Choose the appropriate industry grouping.
Platform
Select the review platform you want to use.
Link
Paste the direct review link for that platform.
Then click Save.
Notes
- Make sure the review link is the correct public review URL for your business profile.
- If the wrong link is used, customers may be sent to the wrong destination.
Suggested screenshots:
- Step 2 expanded with the Review Platforms dropdown
- Create New Review Profile modal
Step 3: Branding
In Step 3: Branding, add the business details that will appear on your feedback page.
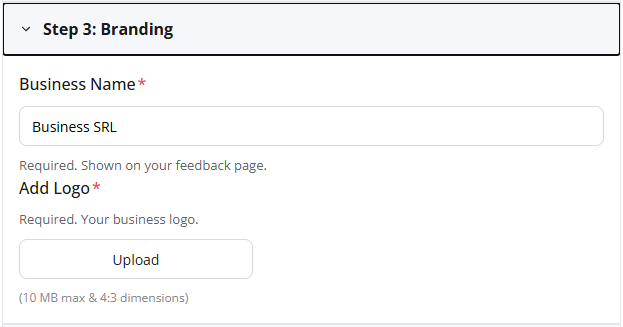
Business Name
Enter your business name in the Business Name field.
This field is marked required and is shown on your feedback page.
Add Logo
Upload your business logo in the Add Logo field.
This field is also required.
The screen notes:
- 10 MB max
- 4:3 dimensions
Using your real business name and logo helps customers recognize your brand and trust the page.
Suggested screenshot: Step 3 expanded showing Business Name and Add Logo.
Step 4: Content
In Step 4: Content, customize the text and contact details used on the feedback page.
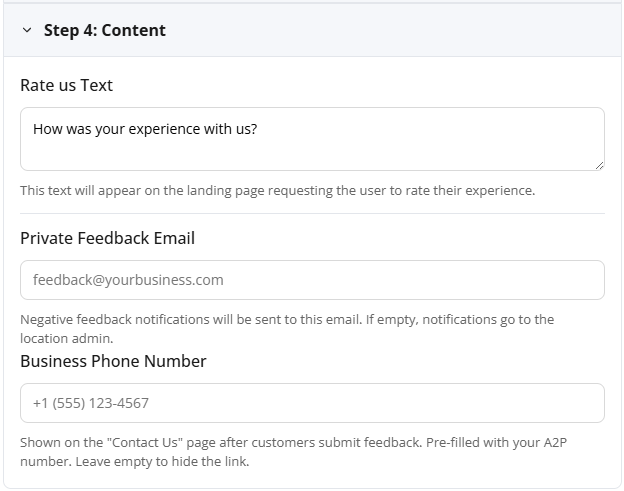
Rate us Text
This is the question shown on the rating page.
Example shown in the UI:
How was your experience with us?
Use short, natural wording so customers know what to do right away.
Private Feedback Email
Enter the email address where private feedback notifications should be sent.
If this field is left empty, the screen indicates that notifications will go to the location admin.
Business Phone Number
Enter the business phone number you want shown on the Contact Us page after a customer submits feedback.
The UI notes that this field may be:
- pre-filled with your A2P number
- left empty if you want to hide the phone link
Suggested screenshot: Step 4 expanded showing Rate us Text, Private Feedback Email, and Business Phone Number.
Preview your Review Link
The Preview panel on the right shows how your review page will appear to customers.
The preview includes:
- your rating question
- star buttons
- a submit button
- ReviewCrusher branding
Use the Reset button in the preview area if you want to reset the preview state while reviewing the setup.
Save or cancel
When you are finished:
- click Save to create the Review Link
- click Cancel to leave without saving
If Save is unavailable, check that all required fields have been completed, especially in the Branding section.
Best practices
- Use 4 Stars as a starting threshold unless you have a specific reason to change it.
- Double-check every public review link before saving.
- Use a monitored email address for Private Feedback Email.
- Keep your Rate us Text simple and direct.
- Upload a clear business logo so the page looks trustworthy and branded.
Troubleshooting
Save button is disabled
Make sure required fields are completed, especially:
- Business Name
- Add Logo
Also confirm your review platform selection is properly set.
I do not see the platform I need
Click Create New Review Profile and add it manually.
Private feedback is going to the wrong place
Check the Private Feedback Email field. If it is empty, feedback notifications go to the location admin.
I do not want a phone link shown after feedback submission
Leave the Business Phone Number field empty.
What customers see
Customers land on a branded rating page and choose a star rating.
Based on the threshold you selected:
- positive ratings can be guided to your public review platform
- lower ratings are directed to private feedback
This helps you capture feedback before it becomes a missed public review opportunity.