.png)
Create and Customize CrushPix
CrushPix lets you create branded images that can be used in your review requests.


From the screenshots, CrushPix supports two starting points:
- Custom Image
- Templates
You can upload your own business image, add a logo, personalize the greeting and message, and preview how the design appears in different channels.
Where to find it
Go to:
Get More Reviews → CrushPix
What you can do in CrushPix
From this page, you can:
- choose between Custom Image and Templates
- view your saved business images
- create a new CrushPix
- edit the title
- upload a background image
- upload a logo
- personalize greeting text
- customize message text
- preview the design in:
- Adjust Image
- SMS
- save the CrushPix when finished
Start with Custom Image or Templates
At the top of the CrushPix panel, you can choose one of two options:
- Custom Image
- Templates
These determine how you build the CrushPix.
Option 1: Custom Image

Use Custom Image if you want to upload and design your own business image.
The screenshots show a Business Images section where saved images appear in a list with radio buttons and titles.
Examples shown include image titles like:
- Crush It Systems test v1
- Highland
- test22
- title
- Skyline Cocktail Bar - Test
- test
To start a new one, click:
Create New
On the right side, the preview area initially shows a message telling you to select a business image to preview or create a new one.
Open or create a CrushPix
When you select an existing image or click Create New, the editing screen opens.
The left panel shows the editable fields.
The right panel shows the preview.
There is also a Save button in the upper-right area of the page.
Step 1: Enter a title
The first editable field is Title.
Use this to name the CrushPix so it is easy to identify later.
In the screenshot, the title example is:
Crush It Systems test v1
Choose a title that helps you recognize the design when selecting it later inside review requests.
Step 2: Upload the background image
Under Background Image, upload the main image that will be used in the CrushPix.
The upload area shows:
- Drop File here
- or click to browse
- 20 MB max
- Recommended: 1200 x 800 px
- JPEG/PNG
After uploading, the selected file appears below the uploader with a thumbnail, filename, and delete icon.
Use a clean image that represents your business clearly.
Step 3: Upload the logo
Under Logo, upload your business logo.
The uploader notes:
- Recommended: PNG with transparent background
- 2 MB max
- Recommended: 300 x 100 px
- JPEG/PNG
After upload, the file also appears below with a thumbnail, filename, and delete icon.
A transparent PNG is recommended so the logo looks cleaner on top of the background image.
Step 4: Customize the greeting
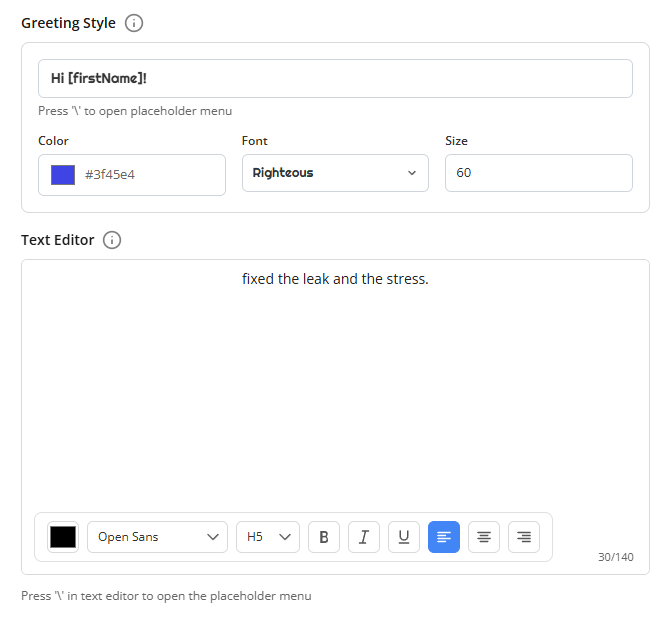
The Greeting Style section controls the personalized greeting text shown on the image.
The screenshot shows these editable fields:
- greeting text
- color
- font
- size
Example greeting text shown:
[firstName]!
The screen also shows this note:
Press '\' to open placeholder menu
This indicates you can insert placeholders into the greeting.
Greeting Style fields
Text
Enter the greeting text that should appear on the image.
Color
Choose the text color.
Font
Choose the font style.
Size
Choose the font size.
In the screenshot, the example values shown are:
- Color:
#4c5bec - Font:
Libre Baskerville - Size:
47
Use this section to style the greeting so it stands out on the image.
Step 5: Customize the message text
Below the greeting is the Text Editor section.
This controls the message text shown on the image.
The screenshot shows example text like:
Hi
kept your systems running smooth.
This editor includes formatting controls such as:
- text color
- font
- heading level
- bold
- italic
- underline
- alignment
It also shows a character counter in the screenshot.
The screen again notes:
Press '\' in text editor to open the placeholder menu
This means placeholders can also be inserted into the message text.
Use short text so the message fits well on the image and stays readable.
Preview tabs
On the right panel, CrushPix includes preview tabs.
For custom images, the screenshots show 3 tabs:
- Adjust Image
- SMS
These help you review how the CrushPix appears in different contexts.
Adjust Image preview
The Adjust Image tab shows the main image preview.
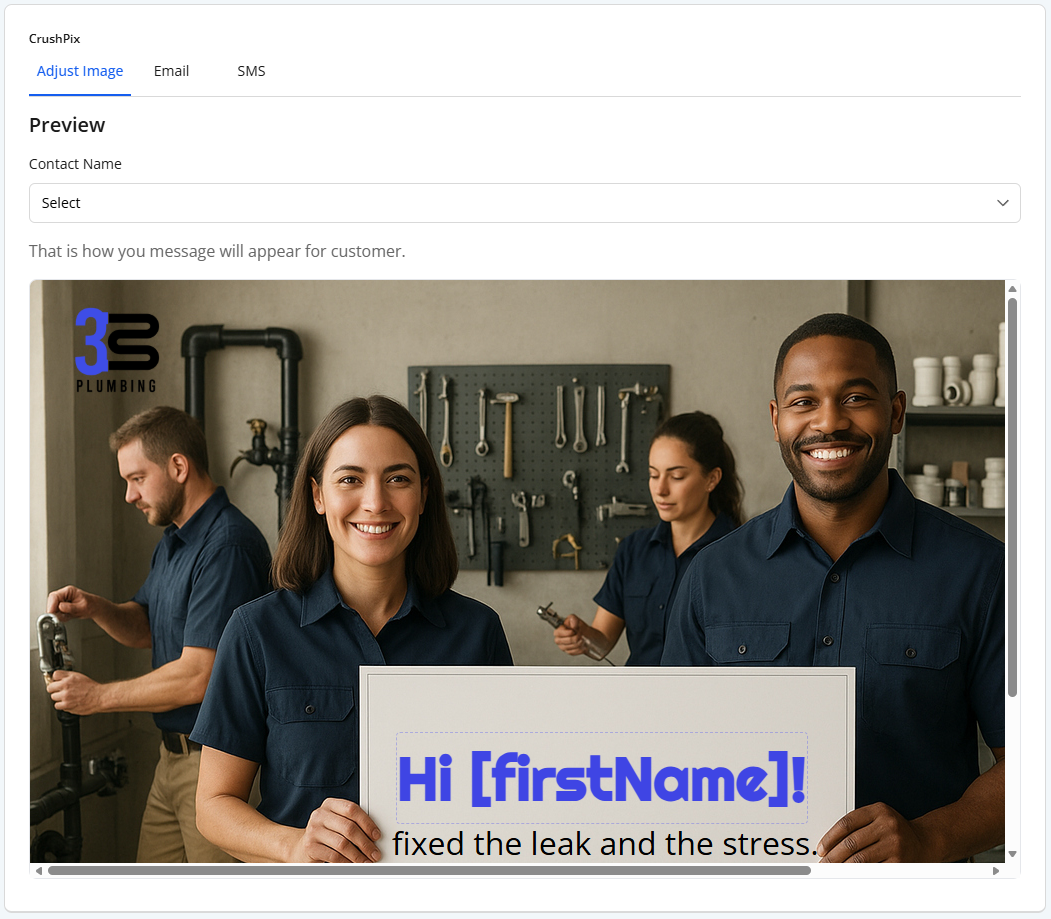
This preview includes:
- a Contact Name dropdown
- the full background image
- the uploaded logo
- the greeting text
- the message text
The preview area lets you see how the personalized content appears on the image itself.
Use this tab to check:
- text placement
- readability
- logo position
- overall composition
Email preview
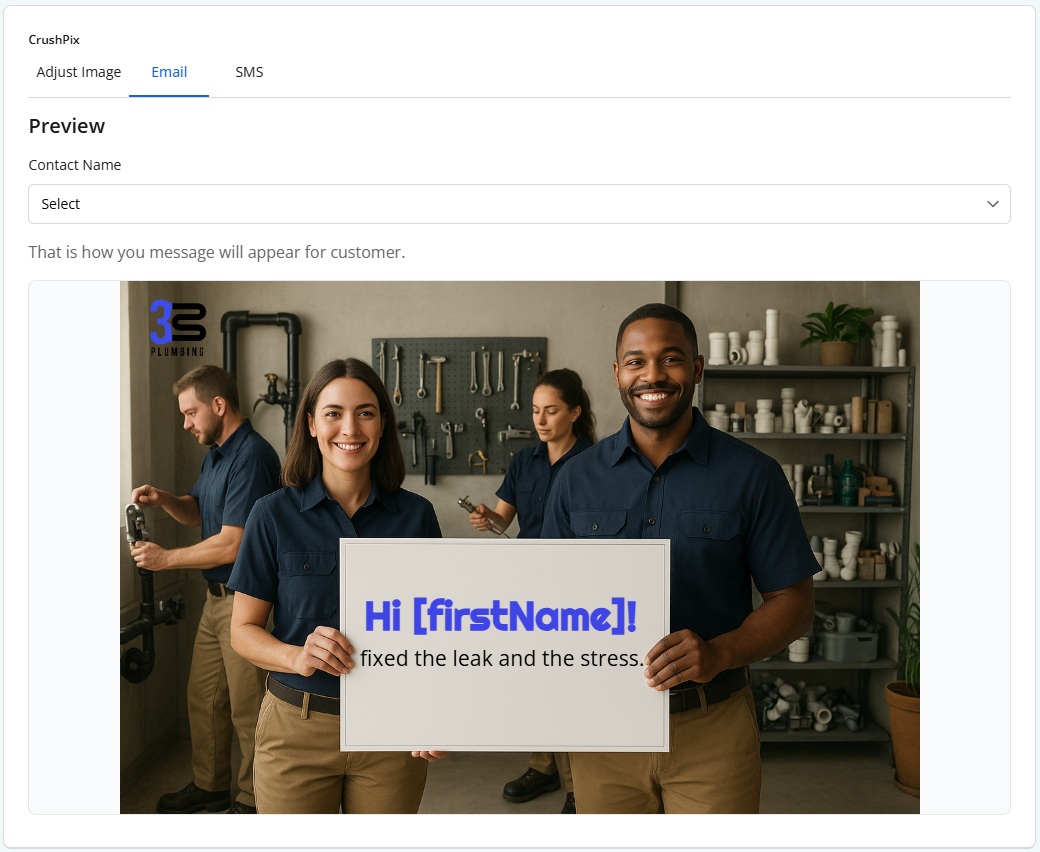
The Email tab shows how the CrushPix appears in an email-style view.
The screenshot shows:
- a Contact Name dropdown
- the CrushPix displayed inside an email preview area
- the logo visible on the image
- the greeting and message shown on the white sign
Use this tab to review how the image may appear when included in an email request.
SMS preview
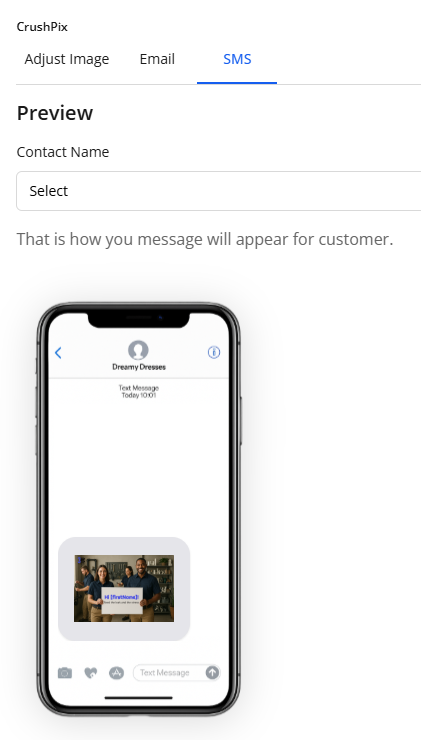
The SMS tab shows a phone-style preview.
The screenshot shows:
- a Contact Name dropdown
- a phone mockup
- the CrushPix displayed inside the message area
Use this tab to review how the CrushPix may appear in an SMS or MMS-style message.
Option 2: Use a template
If you do not want to start from a custom image, choose Templates.

When Templates is selected, the left panel changes to a template selection view.
The screenshots show these fields:
- Business
- Sub Niche
Example values shown:
- Business: Cleaning & Maintenance
- Sub Niche: Pressure Washing
Below the dropdowns, available templates are shown as selectable cards.
The screenshot shows a template example named:
Granite Pressure Washing
Preview a template
When a template is selected, the right panel shows a preview.
In the screenshots, the template mode preview includes:
- Email tab
- SMS tab
- Contact Name dropdown
- preview image showing the selected template
This lets you review how the template looks before making it your own.
Customize a template
Below the selected template, the page shows this message:
Customize your template with a tap. Press the button to make it yours.
Then it provides a Customize button.
Use Customize when you want to turn the selected template into your own editable CrushPix.
Based on the flow shown in the screenshots, this appears to be how you start from a ready-made design and then personalize it.
How to use CrushPix effectively
A practical workflow based on the screenshots is:
- open CrushPix
- choose Custom Image or Templates
- if using Custom Image:
- click Create New
- enter a title
- upload background image
- upload logo
- set greeting text
- set message text
- preview in Adjust Image, Email, and SMS
- if using Templates:
- choose a Business
- choose a Sub Niche
- select a template
- click Customize
- review the preview
- click Save
Best practices
- use a background image that clearly represents your business
- use a transparent logo when possible
- keep greeting text short
- keep the message readable and not too long
- preview the design in all available tabs before saving
- use placeholders carefully so personalization looks natural
Troubleshooting
My image does not look right in preview
Check:
- background image dimensions
- text size
- text placement
- logo size
- contrast between text and image
My logo does not look clean
Use a PNG with transparent background, as recommended in the uploader notes.
The text is too long
Shorten the greeting or message and review the preview again.
I want a faster starting point
Use Templates instead of starting from a custom image.
I want to personalize the text
Use the placeholder option shown in the notes:
- Press '\' to open placeholder menu
- Press '\' in text editor to open the placeholder menu
What the preview tabs are for
Adjust Image
Best for checking the core design layout.
Best for checking how the CrushPix may appear in email.
SMS
Best for checking how the CrushPix may appear in SMS or MMS.