Send Manual Review Requests
The Manual Requests feature lets you send review requests one at a time by email or SMS.

This is useful when you want to personally send a request to specific clients instead of relying on automated workflows.
The page includes two tabs:
- Email Review Request
- SMS Review Request
You can switch between them depending on how you want to contact the customer.
Where to find it
Go to:
Get More Reviews → Manual Requests
From there, choose either:
- Email Review Request
- SMS Review Request
What you can do in Manual Requests

From this screen, you can:
- add one or more recipients
- choose which review link to send
- optionally show your business logo
- optionally attach a CrushPix
- customize the message
- preview how the request will appear
- send a test email or test SMS
- send the request when ready
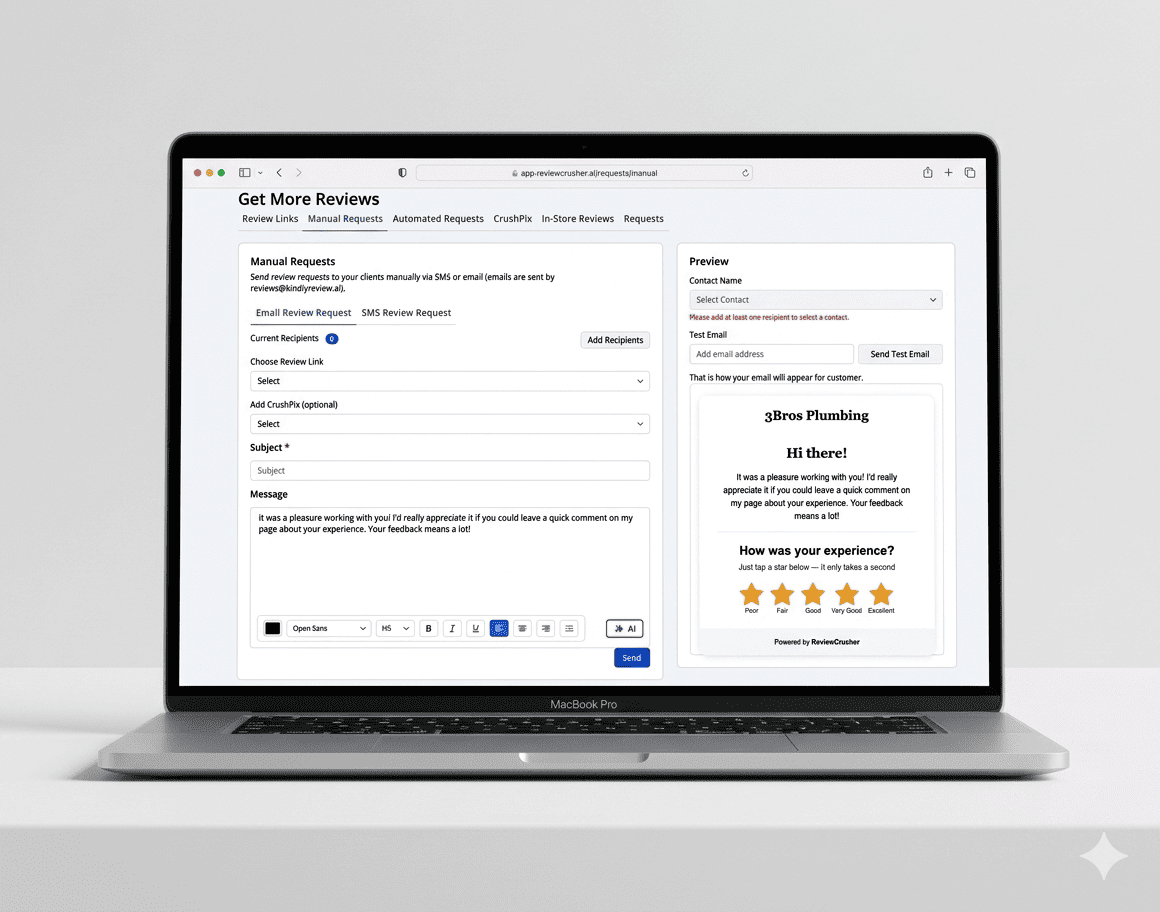
Email Review Request
Use the Email Review Request tab when you want to send the review request by email.
The screen includes a message editor on the left and a preview panel on the right.
Step 1: Add recipients
At the top of the form, you will see Current Recipients and an Add Recipients button.
Click Add Recipients to choose the contacts you want to send to.
The recipient count updates based on how many contacts have been added.
Once recipients are added, the Contact Name dropdown in the preview panel can be used to preview how the email will appear for a selected contact.
Suggested screenshot: Email Review Request page showing Current Recipients and Add Recipients.
Step 2: Choose the review link
Use the Choose Review Link dropdown to select which review link the recipient should receive.
This determines where the customer is directed when they interact with the review request.
Make sure you select the correct review link before sending.
Step 3: Add a business logo (optional)
Under Business Logo (optional), you can upload or change the logo that appears in the email.
The screenshot shows:
- a logo thumbnail
- a Change button
- a delete icon
Use this section if you want the email to be more branded.
If you do not need a logo, you can leave this section optional.
Step 4: Add a CrushPix (optional)
Use Add CrushPix (optional) to include a CrushPix in the request.
A selected CrushPix appears in the field once chosen.
This can make the email more visually engaging.
Step 5: Enter the email subject
The Subject field is required.
Enter the subject line your customer will see in their inbox.
Keep it short and clear so the purpose of the email is easy to understand.
Example ideas:
- We’d love your feedback
- How was your experience?
- Quick review request
Step 6: Write the email message
Use the Message editor to write the body of the email.
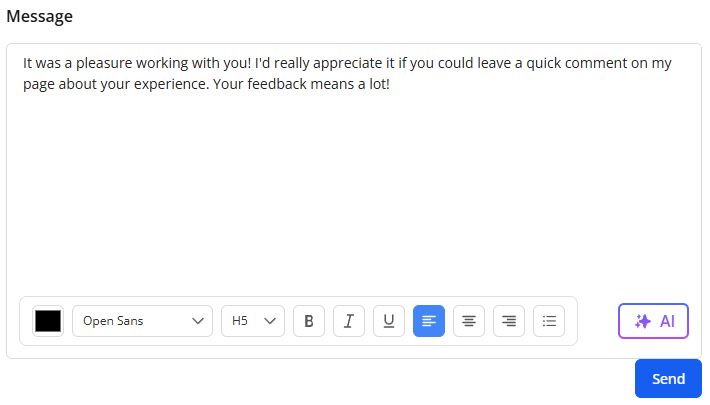
The screenshot shows a rich text toolbar with formatting controls, including:
- font selection
- heading selection
- bold
- italic
- underline
- alignment options
- list options
There is also an AI button, which appears to help generate or improve the message.
Write a short message that:
- thanks the customer
- asks for feedback
- explains what you want them to do
The preview on the right updates to show how the email may look to the customer.
Step 7: Preview the email
The right-side Preview panel shows how the email will appear.

It includes:
- Contact Name dropdown
- Test Email field
- Send Test Email button
- branded email preview
- CrushPix image
- personalized greeting
- message content
- review prompt with star options
The screenshot shows a sample email preview with:
- business logo
- a CrushPix image
- personalized text using the contact name
- the rating prompt
- labeled star ratings:
- Poor
- Fair
- Good
- Very Good
- Excellent
Use the preview to check formatting, branding, and message quality before sending.
Step 8: Send a test email
In the preview panel, enter an email address in Test Email and click Send Test Email.
This helps you verify:
- subject line
- message formatting
- branding
- image placement
- overall appearance
It is a good idea to send yourself a test before sending to customers.
Step 9: Send the email request
Once the content looks correct, click Send.
Before sending, double-check:
- recipients
- selected review link
- subject line
- message content
- branding and CrushPix
SMS Review Request
Use the SMS Review Request tab when you want to send the review request by text message.
This view is similar to the email tab, but it is designed for a shorter message format.
Step 1: Add recipients
At the top of the SMS tab, you will also see Current Recipients and Add Recipients.
Click Add Recipients to add the contacts you want to text.
In the screenshot, the preview panel shows this warning when no recipients are added:
Please add at least one recipient to select a contact.
This means you may need at least one recipient before the preview can fully show a selected contact.
Step 2: Choose the review link
Use the Choose Review Link dropdown to select the review link that will be included in the SMS.
Be sure to choose the correct one before sending.
Step 3: Add a business logo (optional)
Under Business Logo (optional), you can show or change the logo associated with the request.
This appears to be part of the overall branding setup for the message flow.
Step 4: Add a CrushPix (optional)
Use Add CrushPix (optional) to attach a CrushPix to the SMS request.
The screenshot shows a selected CrushPix already added.
This may help make the message more noticeable or branded in the preview.
Step 5: Write the SMS message
Use the Message box to write the SMS request.
The screenshot shows a sample message like:
Hi [Contact's Name], thanks for choosing our service! Please leave us a review: [your review link]
The SMS message area also shows:
- a character count
- an AI button
The screenshot also displays this note:
Press '\' in text editor to open the placeholder menu
This indicates that placeholders can be inserted into the message.
Because SMS should stay short and readable, keep the message simple and direct.
A good SMS usually includes:
- a greeting
- a thank-you
- a request for a review
- the review link
Step 6: Preview the SMS
The right-side Preview panel shows how the SMS may appear on a phone.

It includes:
- Contact Name dropdown
- Test SMS field
- Send SMS button
- phone mockup preview
The phone preview shows how the message might appear to the customer, including the review link.
Use this to check length, readability, and overall presentation.
Step 7: Send a test SMS
In the preview panel, enter a phone number with country code into Test SMS.
Then click Send SMS to test the message.
This helps you confirm:
- message clarity
- placeholder behavior
- link appearance
- overall SMS layout
Step 8: Send the SMS request
Once everything looks correct, click Send.
Before sending, confirm:
- recipients are correct
- the review link is correct
- the message is short and clear
- the preview looks right
Best practices
For email
- use a clear subject line
- keep the message short and polite
- send yourself a test email first
- use branding only when it improves clarity and trust
For SMS
- keep the message short
- include only the most important information
- use placeholders carefully
- send a test SMS before sending to customers
For both
- make sure the correct review link is selected
- confirm the recipient list before sending
- preview the final message before clicking Send
Troubleshooting
I cannot preview a contact
Make sure you have added at least one recipient.
The SMS preview specifically shows a warning when no recipients are present.
My test message is not ready to send
Check whether you entered:
- a valid test email address for email requests
- a valid phone number with country code for SMS requests
The wrong review link may be included
Review the Choose Review Link dropdown before sending.
The message does not look right
Use the preview panel to review formatting, branding, message length, and clarity before sending a live request.
What the customer sees
Email request
The customer appears to receive:
- your logo
- optional CrushPix
- your message
- a review prompt with star choices
SMS request
The customer appears to receive:
- a short text message
- your review request
- the review link
- optional branded/visual content depending on the setup